
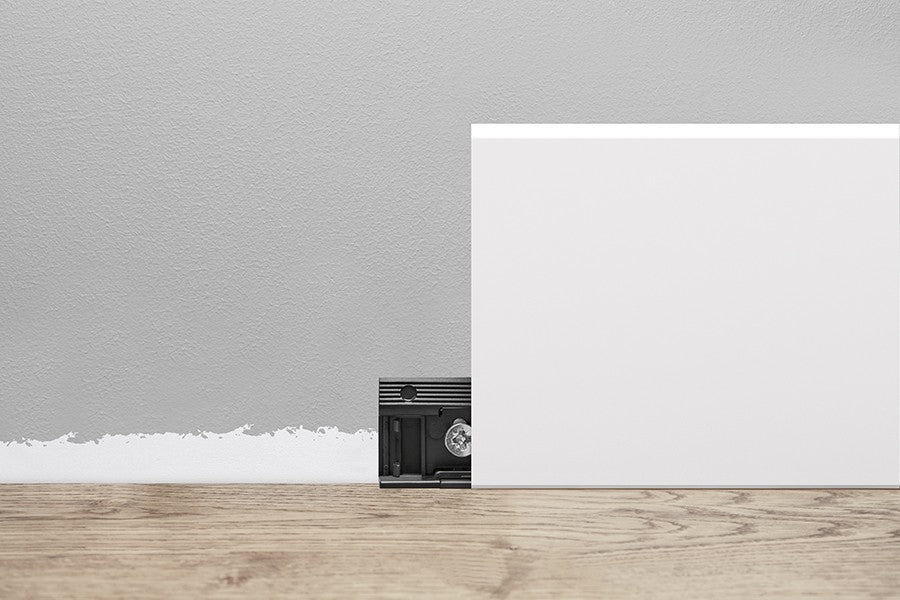
The choice of the appropriate skirting board installation technique determines the final visual effect, the aesthetics of the joints, and the durability of the entire finish. While traditional direct gluing has remained a proven standard for years, modern mechanical systems – such as mounting clips – offer unique benefits tailored to specific technical conditions in the room.
In this guide, we will analyze when it is worth implementing individual solutions, based on professional polystyrene profiles and accessories from the Cezar brand.

1. Traditional adhesive mounting – when is it irreplaceable?
Directly gluing the profile to the wall is the most universal method and the one most frequently chosen by installers. It ensures maximum monolithic stability for many years.
-
When to use: This solution is ideal for simple and stable plasters, in high-traffic areas, and when installing high-end premium profiles, such as elite living room finishes. Floors and walls then gain a uniform, impeccable outline.
-
Recommended products: For this type of work, an adhesive with powerful initial grab is essential to prevent the profile from pulling away from the substrate during drying. An excellent choice is the Expert white Creativa by Cezar mounting adhesive.
-
Joining technique: Professional installation requires using a special elastic joint adhesive for vertical gaps and transverse joints, which eliminates the risk of cracks at the joints in the future. Detailed step-by-step instructions on how to perform such an installation are described in our dedicated guide on how to mount skirting boards with adhesive.
2. Skirting board installation with clips – development of mechanical technology
Mechanical installation using dedicated clips is an advanced alternative to liquid adhesives, revolutionizing the finishing process and interior use. This system is based on precisely anchoring metal or plastic fasteners to the substrate, onto which the suitably profiled back of the skirting board is then slid from above and firmly snapped into place.
When is it worth choosing the clip system?
This solution is designed for functionality and the dynamics of modern construction. It works best in the following scenarios:
-
Non-invasive repeated disassembly: If you plan to change the arrangement, wallpaper, refresh, or paint the walls in the near future, clips are indispensable. The skirting boards can be removed at any time, set aside during dirty work, and reinstalled after the paint dries – without tearing off plaster or damaging the wall structure.
-
Routing low-voltage installations: The technical space created between the wall and the inner profile of a clip-mounted skirting board allows for aesthetic and completely invisible concealment of cables (e.g., TV, fiber optic, or internet cables).
-
Working with floating floors: The clip design allows for optimal vertical pressure while not impeding the natural movement of floor panels that react to changes in humidity and temperature.
Precise execution guidelines (Step by step)
Proper implementation of the mechanical system requires strict adherence to the manufacturer's technological regime, which ensures that the skirting board will not stick out or spring back:
-
Planning and marking points: The first mounting points are set strictly 5 cm from each corner (internal and external) and from door frames. This is crucial for stabilizing corner joints.
-
Maintaining linear spacing: On straight wall sections, holes for wall plugs should be drilled in series at regular intervals of 30–40 cm. Too sparse a distribution of clips will weaken the profile's holding power.
-
Mechanical anchoring: After drilling the holes, wall plugs are embedded in the substrate, and then the clip is screwed in using a screwdriver with a PZ2 bit, which perfectly fits the socket of Cezar's factory screws.
-
Compensating for expansion joints (System with a +3 mm washer): In the case of wall curvature or the need to cover a wider expansion joint for the floor, the technology provides for mounting the clip with a special +3 mm spacer washer. This moves the base point away from the wall and allows for hassle-free attachment of the profile in difficult technical conditions.
-
Snapping the profile: The final step is to place the skirting board from above directly onto the mounted row of clips and press it down evenly and firmly until a characteristic click of the lock is heard.
Most common installation mistakes – how to avoid them?
-
Using aggressive construction chemicals: The use of acetic (acetate) silicones for mounting and sealing polystyrene skirting boards is strictly prohibited. They react with the material, permanently discolouring it and destroying its structure.
-
Ignoring acclimatisation: Before starting work, the profiles must be seasoned in the target room for a minimum of 24 hours in a horizontal position on a flat surface, which prevents later material shrinkage.
Poor preparation of joints: Raw, unfinished edges cut at a 45-degree angle spoil the final premium effect. For their perfect masking and smoothing, use the dedicated Creativa by Cezar plaster molding filler.

Summary – expert installer's checklist
-
[ ] Acclimatize the baseboards in their original packaging for 24 hours before cutting.
-
[ ] Ensure that the surface for gluing is completely dust-free, dry, and degreased.
-
[ ] For mechanical installation, maintain a clip spacing of 30–40 cm and 5 cm from corners.
-
[ ] Make precise 45-degree miter cuts using a miter box or miter saw.
-
[ ] Finish transverse joints with flexible filler and sand them smooth after drying.
FAQ Section
Can polystyrene baseboards be painted any color?
Yes, the surface of modern polystyrene baseboards is factory-prepared for painting. For this purpose, acrylic or latex paints free of solvents should be used. Profiles can be painted directly with the wall, which allows for a cohesive, monolithic effect of optically raising the interior.
When is it better to use a clip with a +3 mm spacer, and when a regular one?
A clip with a spacer is used when the expansion gap left between the panel and the wall is wider or when the wall has local bulges. The additional 3 millimeters of distance allow for proper top-down latching of the baseboard without material tension.
What tools do I need to install baseboards with clips?
You will need a drill for making holes in the wall, a screwdriver or power drill with a PZ2 bit for precise tightening of the clamps, and a fine-tooth saw for cutting profiles at an angle.
Where can I find the full range of polystyrene profiles and mounting accessories?
All modern, moisture-resistant decorative profiles, dedicated adhesives, clamps, and pads can be found directly in the manufacturer's store by visiting the official category including Intense polystyrene skirting boards.


Share:
How to install skirting boards with adhesive? Step-by-step guide
How to choose baseboards? 5 rules you need to remember